Imagine diving into a creamy, zesty Taco Dip that bursts with the rich flavors of seasoned beef, tangy salsa, and velvety cheese. Each layer invites you to indulge in a delightful symphony of textures, where crunchy tortilla chips meet the luscious dip, creating an irresistible party staple that guarantees smiles all around.
This Taco Dip isn’t just food; it’s a cherished memory from countless gatherings where laughter mingles with the savory aromas wafting through the air. Whether it’s game day, a festive celebration, or simply a cozy night in with friends, this dip promises to elevate any occasion and leave taste buds dancing in delight.
Why Does Everyone Love Taco Dip?
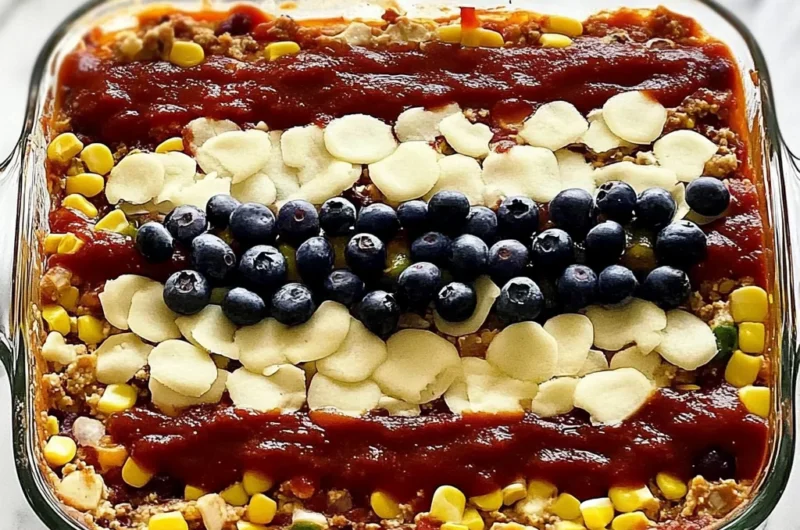
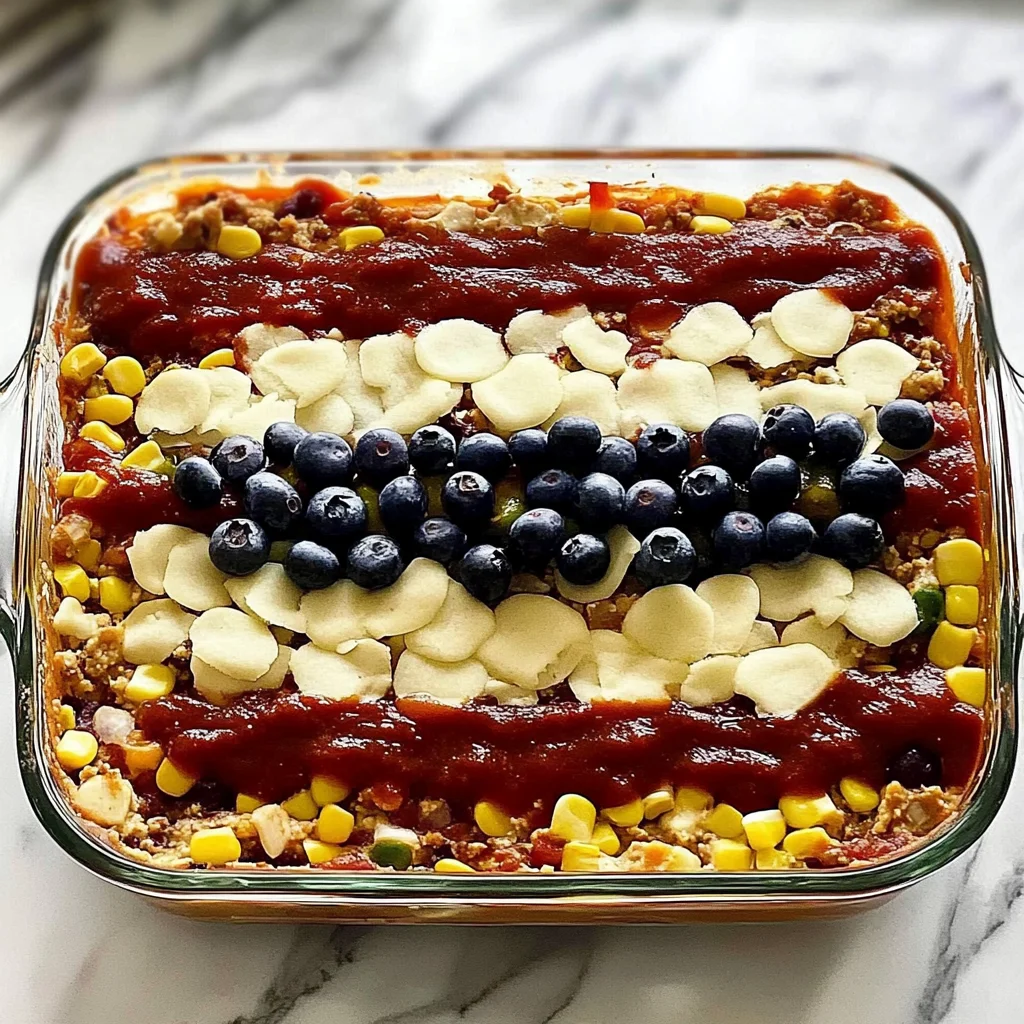
Deliciously layered with rich flavors, this Taco Dip brings a fiesta to any gathering! Creamy base of sour cream and cream cheese mixed with zesty taco seasoning creates an irresistible start. Heartiness from refried beans and guacamole adds depth, while tasty toppings like cheddar cheese, tomatoes, olives, and green onions ensure every bite is a crowd-pleaser. Quick to prepare, this no-cook recipe takes just 15 minutes, making it the perfect party treat that everyone will enjoy!
Ingredients for Taco Dip
For the Base Layer
- 1 cup sour cream – Adds a creamy tang that balances the bold taco flavors beautifully.
- 1 cup cream cheese (softened) – Provides a rich and smooth texture, making your dip irresistible.
- 1 packet taco seasoning – Infuses the dip with classic taco spices that everyone loves.
For the Middle Layer
- 1 cup refried beans – Offers a hearty base that pairs perfectly with the other layers.
- 1 cup guacamole – Brings a fresh, creamy element that enhances the overall flavor profile.
For the Toppings
- 1 cup shredded cheddar cheese – Melts beautifully on top, adding both flavor and color to your Taco Dip.
- 1 cup diced tomatoes (drained) – Provides a juicy burst of freshness while keeping the dip from getting soggy.
- 1/2 cup sliced black olives – Adds a salty kick and a touch of elegance to your presentation.
- 1/4 cup chopped green onions – Offers a bright pop of color and a mild onion flavor to finish off the dish.
Step-by-Step Taco Dip

1. Combine In a mixing bowl, combine 1 cup sour cream, 1 cup softened cream cheese, and 1 packet taco seasoning. Mix until smooth and creamy, creating a rich base for your flavorful layers.
2. Spread Gently spread 1 cup refried beans evenly in the bottom of a serving dish. This hearty layer adds a delightful texture that complements the upcoming flavors beautifully.
3. Layer Carefully layer the sour cream mixture on top of the beans. You’ll want to evenly distribute this creamy goodness for the perfect bite every time.
4. Top Next, spread 1 cup of guacamole over the sour cream layer. Its vibrant green color and fresh taste will make your Taco Dip feel like a fiesta!
5. Sprinkle Now it’s time to sprinkle 1 cup shredded cheddar cheese, followed by 1 cup diced tomatoes (drained), ½ cup sliced black olives, and ¼ cup chopped green onions on top. Each topping adds a burst of flavor and color!
6. Chill Finally, chill your assembled dip in the refrigerator for 30 minutes before serving with crispy tortilla chips. This helps all those delicious flavors meld together!
Optional: Serve with extra tortilla chips on the side for dipping!
Exact quantities are listed in the recipe card below.
Tips for the Best Taco Dip
- Sour Cream Consistency: Use full-fat sour cream for a creamier texture; low-fat versions can make the dip too runny.
- Cream Cheese Softness: Ensure your cream cheese is softened at room temperature for easier mixing and a smoother base layer.
- Seasoning Balance: Adjust the taco seasoning to taste; start with half the packet, adding more if you prefer a bolder flavor in your Taco Dip.
- Bean Layer Stability: Spread refried beans evenly to create a sturdy base; uneven layers can lead to a messy serving experience.
- Chill Time Importance: Don’t skip the chilling step! This allows flavors to meld and enhances the overall freshness of your dip.
- Topping Drainage: Always drain diced tomatoes well to prevent excess moisture, which could make your Taco Dip soggy.
How to Store and Freeze Taco Dip
- Fridge: Keep your Taco Dip covered in an airtight container for up to 3 days to maintain freshness and flavor.
- Freezer: You can freeze the base layers (sour cream, cream cheese, refried beans) without toppings for up to 2 months. Thaw in the fridge before serving.
- Toppings: Fresh toppings like tomatoes, olives, and green onions should be stored separately in the fridge and used within 1-2 days for the best taste.
- Reheating: If you prefer it warm, gently microwave the base layers until heated through, then add fresh toppings right before serving.
Taco Dip Your Way
Feel free to unleash your creativity and customize this layered delight to suit your taste buds!
- Spicy Kick: Add 1–2 tablespoons of diced jalapeños or a splash of hot sauce for an extra zing. The heat can elevate the traditional flavors and keep everyone coming back for more.
- Creamy Avocado: Swap out the sour cream with 1 cup of creamy avocado yogurt for a rich, velvety texture. This substitution not only adds a unique flavor but also brings in a healthy twist that will have guests raving.
- Black Bean Boost: Replace refried beans with mashed black beans for a heartier, protein-packed layer. The earthy richness complements the taco seasoning beautifully and provides an irresistible depth of flavor.
- Veggie Delight: Mix in finely chopped bell peppers or corn into the guacamole for added crunch and sweetness. These vibrant veggies not only brighten the dip but also enhance its texture, making every bite an adventure.
- Herbed Cheese: Use herbed cream cheese instead of plain for an aromatic flavor infusion. This simple swap transforms the base layer into a garden-fresh experience that pairs wonderfully with the other classic ingredients.
- Tangy Twist: Incorporate 1 tablespoon of lime juice into the sour cream mixture for a zesty brightness. This little addition balances the rich flavors and makes your taco dip utterly refreshing.
- Cheese Variety: Try using pepper jack cheese in place of cheddar for a creamy, spicy finish. The added heat from pepper jack creates an exciting contrast, perfect for those who love a little thrill in their dishes.
Make Ahead Options

This Taco Dip is not only a crowd-pleaser but also a fantastic choice for meal prep, allowing you to enjoy your time with guests instead of being stuck in the kitchen. You can prepare the Base Layer by mixing 1 cup of sour cream, 1 cup of softened cream cheese, and 1 packet of taco seasoning. This mixture can be made up to 24 hours in advance. Additionally, the refried beans and guacamole can be spread into your serving dish ahead of time—just keep everything covered in the refrigerator. For best results, add the toppings like shredded cheddar cheese, diced tomatoes, black olives, and green onions just before serving to maintain their freshness and crunch. Chill the assembled dip for at least 30 minutes before enjoying it with tortilla chips, ensuring every layer is perfectly melded together for maximum flavor!
Taco Dip Questions Answered
What kind of sour cream should I use?
For the best flavor and texture, opt for full-fat sour cream. It will create a creamier base layer that holds up well against the other ingredients in your taco dip, ensuring each bite is rich and satisfying.
Can I make this taco dip ahead of time?
Absolutely! You can prepare the layered dip up to a day in advance. Just cover it tightly with plastic wrap or a lid and store it in the refrigerator. This allows the flavors to meld beautifully, making it even more delicious when served!
How do I store any leftover taco dip?
Store any leftover taco dip in an airtight container in the refrigerator for up to 3 days. The layers may slightly blend together over time, but it will still taste fantastic! Just give it a gentle stir before serving again.
Can I freeze taco dip?
While it’s not recommended to freeze the entire layered dip due to the cream cheese and guacamole, you can freeze individual components like refried beans or guacamole separately. Just thaw them overnight in the fridge before assembling your dip fresh again!
What can I serve with taco dip besides tortilla chips?
Get creative! While tortilla chips are classic, you might also enjoy serving your taco dip with veggie sticks like carrots or celery, pita chips, or even spread on toast or crackers for a delightful twist!
How many servings does this recipe yield?
This scrumptious taco dip serves about 4 people, making it perfect for small gatherings or as an appetizer during family movie night. Each serving contains roughly 250 calories, so it’s a guilt-free indulgence everyone will love!
Taco Dip
Ingredients
Method
- In a mixing bowl, combine sour cream, cream cheese, and taco seasoning. Mix until smooth.
- Spread the refried beans evenly in the bottom of a serving dish.
- Layer the sour cream mixture on top of the beans.
- Spread guacamole over the sour cream layer.
- Top with shredded cheddar cheese, diced tomatoes, black olives, and green onions.
- Chill in the refrigerator for 30 minutes before serving with tortilla chips.